 SEAL CONNECT
Precision Matters: A Complete Guide to Measuring for SEPCO SAS Air Seals
With industrial equipment, reliability and efficiency aren’t optional—they’re everything. That’s where the SEPCO SAS (Air Seal) really stands out. It’s designed for tough applications involving powders, slurries, and other difficult materials, using a non-contact pneumatic barrier to prevent leaks, contamination, and wear.
But here’s the reality: even a small measurement mistake can create big problems—poor fit, early failure, unplanned downtime, or even safety concerns. Getting the measurements right isn’t just a best practice—it’s what makes the seal work the way it’s supposed to.
Whether you’re in maintenance, operations, or tackling this for the first time, this guide will walk you through how to measure correctly—and why it matters.
Why Accurate Measurements Matter
It doesn’t take much. A fraction of a millimeter off can throw everything out of balance. In powder handling applications, that might mean inconsistent airflow, product contamination, or escaping particulates.
Because the SAS is a non-contact design, it relies on tight tolerances to maintain a consistent air barrier. If the fit isn’t right, performance suffers. Over time, that can lead to higher energy use, equipment wear, or compliance issues in more sensitive environments.
We’ve seen it plenty of times—skipping or rushing measurements is one of the fastest ways to end up with a seal that underperforms. Use the right tools (calipers, micrometers), take your time, and always measure on clean surfaces.
And if something doesn’t look right, it’s worth double-checking against SEPCO’s technical resources or reaching out for application support. Getting it right up front saves a lot of trouble later.
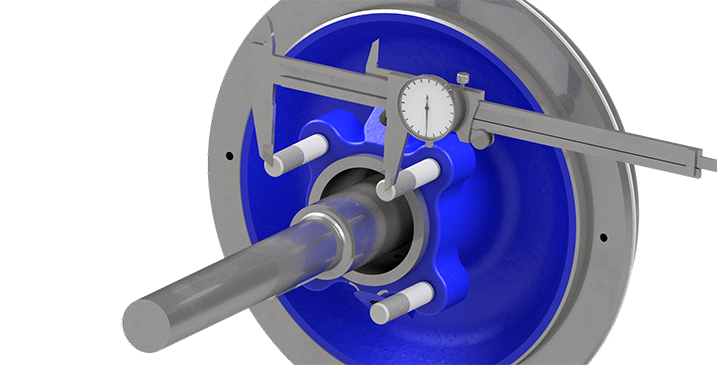
Step-by-Step: Measuring for an SAS Air Seal
This process works whether you’re replacing an existing seal or installing a new one. The key is consistency—take your time and document everything as you go.
Start with the Documentation
Before you pick up a tool, review your equipment specs. Model numbers, drawings, and recommended seal types (solid vs. split SAS) will give you a baseline. Skipping this step can lead to mismatched components.
Measure the Shaft (or Sleeve OD)
Use a calibrated caliper or micrometer and take readings in multiple spots—around the circumference and along the shaft. You’re looking for wear, taper, or inconsistencies.
Measure the Seal Chamber Bore
Check the inside diameter of the stuffing box or seal chamber. Measure in several locations to confirm it’s consistent. Any out-of-round condition can affect how the seal sits.
Measure the Chamber Depth
Use a depth gauge to determine how far the seal will sit from the outer face to the gland. This affects positioning and performance.
Check the Available Axial Length
Make sure there’s enough room along the shaft for the seal to fit without interference.
Check Runout and End Play
Use a dial indicator to measure shaft movement—both radial and axial. Since the SAS relies on airflow, excessive movement can disrupt performance.
Document Operating Conditions
Don’t skip this. Temperature, pressure, RPM, and media type all influence how the seal should be designed and applied.
Verify Your Measurements
Compare your numbers to the original seal (if available) or a SEPCO data sheet. If anything feels off, send it over to SEPCO’s team for a second look. It’s worth the extra step.
Check Your Tools
Before wrapping up, make sure your tools are calibrated and zeroed out. Small errors here can throw everything else off.
Installation & Operation Tips
Once everything is measured correctly, installation is straightforward. The SAS uses spacers for positioning and requires a steady air supply to function properly.
Keep an eye on air pressure and flow—it’s what keeps the seal operating as intended. If your equipment has some misalignment, the SEPCO SAS Air Seal is designed to handle typical variations without sacrificing performance.
Final Thoughts
Taking the time to measure properly pays off—less downtime, fewer headaches, and better overall performance.
With SAS seals, precision isn’t overkill—it’s the difference between a system that runs smoothly and one that constantly needs attention.
For the latest specs and recommendations, it’s always a good idea to check SEPCO’s official resources, especially as equipment and standards evolve.
 Find Your Sealing Solution