 SEAL CONNECT
How to Install a Mechanical Split Seal: A 12-Step Field Checklist
 Quick answer: Installing a mechanical split seal correctly comes down to four things — verifying the equipment is within runout and endplay tolerance before you start, keeping the lapped faces and split line clean and untouched, torquing evenly in a cross pattern, and testing at low speed before returning to service. Most premature split seal failures trace back to one of these four, not to the seal itself.
Split seals earn their place by letting you seal equipment you can’t easily take apart — vertical pumps, paper machine rolls, large agitators, anything where pulling the coupling means a day of lost production. That advantage disappears if the install is rushed.
The checklist below is ordered the way the job actually runs.
Before you start: verify the equipment, not just the seal
A split seal cannot compensate for equipment that’s out of tolerance, and it can’t compensate for being the wrong seal. Check these first, because finding a problem here costs you an hour — finding it after startup costs you the seal.
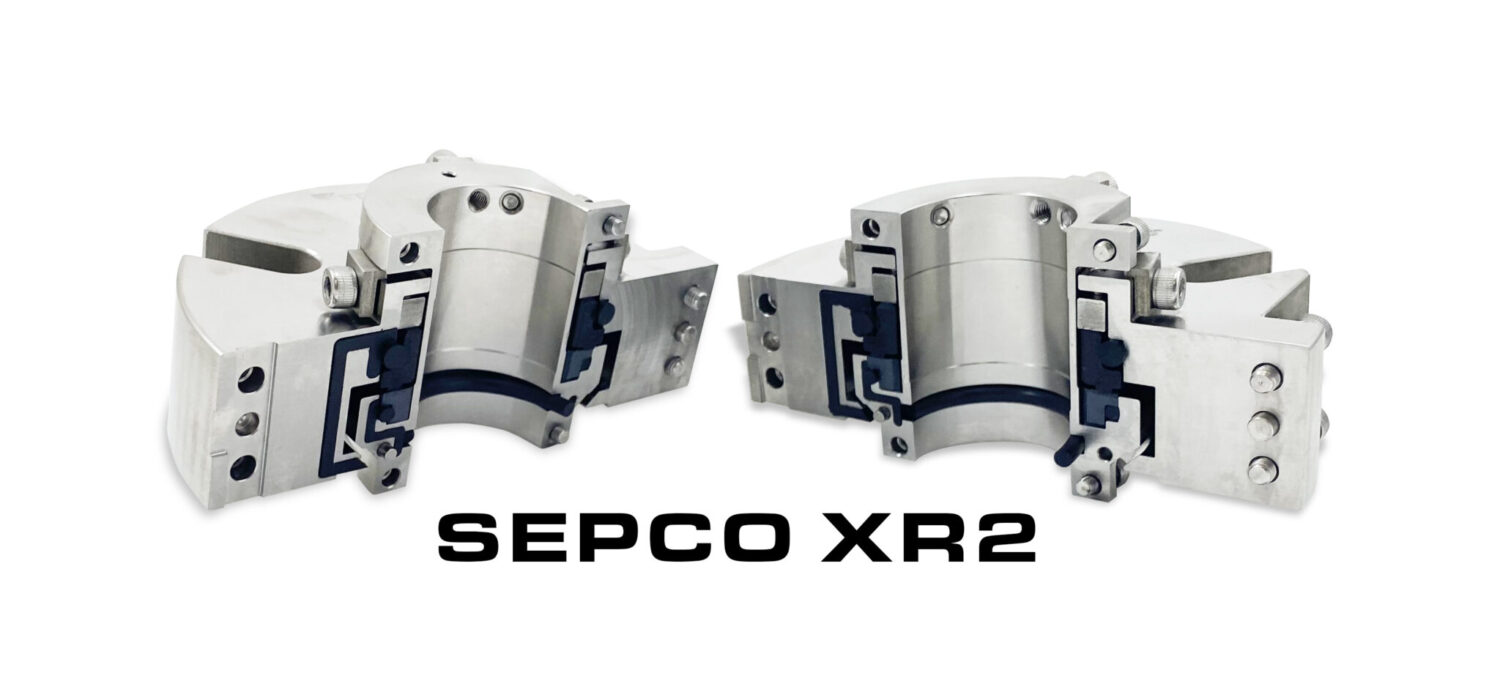
- The seal itself. Check the part number against the equipment, the process fluid, and the operating conditions. Confirm the elastomers are compatible with what’s in the line and with the temperature range you’ll see. The XR2 handles pressures to 200 psi (17 bar), which covers most split seal applications — confirm your service falls inside it.
- Shaft or sleeve runout. Measure total indicator reading at the seal location and compare it against the limit in your seal’s installation manual. Tolerances vary by model and shaft diameter, so use the figure for the seal in your hand rather than a rule of thumb.
- Axial endplay. Measure it and check it against the same manual. Excessive endplay unloads and reloads the faces on every cycle, and it will shorten seal life regardless of how well the install goes.
- Radial movement at the seal chamber. Worn bearings will show up here first.
- Surface condition. Scratches, burrs, pitting, or a worn groove from a previous packing set will all prevent the secondary seals from sealing. Unlike a cartridge seal, you generally can’t replace a sleeve without the disassembly you were trying to avoid — so this is the check that decides whether a split seal is the right call at all.
If you don’t have the installation and maintenance instructions for your seal, contact SEPCO and we’ll send them.
The 12-step installation checklist
1. Lock out and tag out
De-energize and lock out the equipment before anything else. Verify zero energy state. Confirm the line is depressurized and drained.
2. Verify the halves are a matched set
Split seal faces are lapped as a pair. Mixing halves from two seals, or reversing them relative to each other, produces a face that won’t seal no matter how carefully you torque it. Check match marks and keep the set together from the moment the box opens.
3. Clean the shaft, seal chamber, and faces
Wipe the shaft or sleeve, the seal chamber bore, and the gland face. Clean the lapped faces with isopropyl alcohol and a lint-free wipe. Handle faces by their outside diameter — skin oils on a lapped face are enough to affect performance on startup.
Old packing residue, gasket material, and scale all have to come out of the chamber. Anything left behind ends up at the faces.
4. Lubricate with the specified lubricant only
A thin film on the shaft or sleeve eases installation and protects the secondary seals. The lubricant has to be compatible with the elastomer — petroleum-based products will swell and destroy EPDM/EPR. Use what’s supplied with the seal or specified in the manual, and use a light film, not a coating.
5. Position the seal and set the orientation
Split seals have a defined orientation. Before anything is tightened:
- Confirm the halves are oriented per the manual
- Position flush, quench, and drain ports at the correct clock position for your piping plan
- Confirm the gland split line will clear the bolts, piping, and any nearby obstruction
Getting this wrong means undoing everything you’re about to do.
6. Join the halves at the split line
This is the step that has no equivalent on a cartridge seal, and it’s where split seal installations most often go wrong.
Bring the halves together squarely — not at an angle. Confirm the gaskets and O-rings at the joint are seated and unpinched. On the XR2, O-rings and gaskets are factory installed and tested, so they need no adjustment; your job is to make sure nothing shifts or gets pinched as the halves come together. Verify the split line is fully closed with no visible gap before applying any load.
7. Torque the gland bolts evenly, in a cross pattern
Uneven load distorts the seal faces. A face that’s out of flat by a few tenths of a thousandth will leak regardless of how good the seal is.
Work in a star or cross pattern, in at least two passes. Torque values vary by seal model and bolt size, so use the figure in your installation manual rather than a general-purpose number.
The pattern matters as much as the value. Seating one side fully before starting the other distorts the faces even when the final torque reading is correct on every bolt.
8. Set the drive collar or set screws evenly
Same principle. Tighten in stages, opposite screws first, to spec. Over-torquing set screws can mark the shaft and make the next removal harder.
9. Remove any centering or setting devices — in the right order
Split seal designs differ here. Some use centering clips or setting spacers that hold the seal in position during assembly. Others, including the XR2, arrive with O-rings and gaskets factory installed and factory tested, requiring no user adjustment at all. Check your installation manual for which applies to the seal in front of you.
If your seal does use them, remove them only after the gland is fully torqued and the drive collar is set. Removing them early lets the seal shift. Forgetting to remove them entirely is a classic and expensive mistake.
Either way, rotate the shaft by hand before going further. It should turn freely with no binding or scraping.
10. Connect flush, quench, and drain piping
Reconnect per the applicable API flush plan. Confirm flow direction, verify the flush reaches the faces, and check that drains are open. A split seal with a blocked flush line will run dry and fail in minutes.
11. Test at low speed before returning to service
Restore power, remove locks and tags, and start the equipment at the lowest practical speed. Watch for:
- Visible leakage at the split line and at the shaft
- Unusual noise or vibration
- Temperature rise at the seal chamber
Run it long enough to reach steady state before walking away. Minor weeping on initial startup that stops within a few minutes is normal as faces seat; leakage that persists or increases is not.
12. Document the installation
Record the date, seal model and serial number, equipment tag, measured runout and endplay, torque values used, and anything unusual. When this seal is pulled in three years, that record is the difference between a ten-minute diagnosis and a two-hour guess.
The four mistakes that cause most split seal failures
- Installing on out-of-tolerance equipment. The seal gets blamed for a bearing problem.
- Uneven torque. Distorted faces leak from day one.
- Contamination at the faces or split line. A single particle is enough.
- Skipping the low-speed test. Problems get discovered at full load instead of at 200 rpm.
After the install
Two things that aren’t installation steps but determine whether the install holds:
Inspect on a schedule. Add the seal to your PM route and check for weeping, temperature change, and vibration at regular intervals.
Train the crew. Split seal installation is a learnable skill with a real learning curve. SEPCO provides hands-on training on installation and troubleshooting.
Frequently asked questions
How long does it take to install a mechanical split seal?
On accessible equipment that’s already within tolerance, most split seal installations take under an hour — far less than the several hours or full shift required to pull a pump for a cartridge seal.
Should I use a split seal or a cartridge seal?
Access is usually the deciding factor. If the equipment can be pulled without major disruption, a cartridge seal is typically the better long-term choice — it installs as a pre-assembled unit with less room for installation error. If disassembly means pulling a coupling, moving a driver, or taking a critical line down for a shift, a split seal earns back its cost on the first install. This comparison of single spring, component, and cartridge seals covers the non-split options in more detail.
Do you have to disassemble the pump to install a split seal?
No. That’s the reason split seals exist. The seal assembles around the shaft in place, so the coupling, bearing housing, and driver stay where they are.
What causes a split seal to leak at the split line?
Usually a pinched or unseated gasket at the joint, uneven gland torque, or debris trapped between the halves. Less commonly, equipment runout outside the seal’s tolerance.
Can a split seal be installed on a worn shaft?
Only within limits. Scoring or a worn groove at the seal location will prevent the secondary seals from sealing. Measure before you commit — a plant equipment survey will identify which equipment is a candidate.
What pressure can a mechanical split seal handle?
It varies by design. The balanced SEPCO XR2 is rated to 200 psi (17 bar), which is at the higher end for split seals and covers most industrial services.
 Find Your Sealing Solution